Foam quality can be considered a combination of factors including:
- Stability
- Whiteness
- Texture
- Lacing
- Robustness
All of which are linked to appearance, an important quality parameter that is made up of further factors including colour, clarity, brightness, carbonation, tracing & bubble type. Traditional foam tests focus on attempting to quantify foam stability, our test is a broader attempt to give the brewer a simple way to compare foam and the wider appearance of a beer brand.
For an overview of the science of beer foam click Here
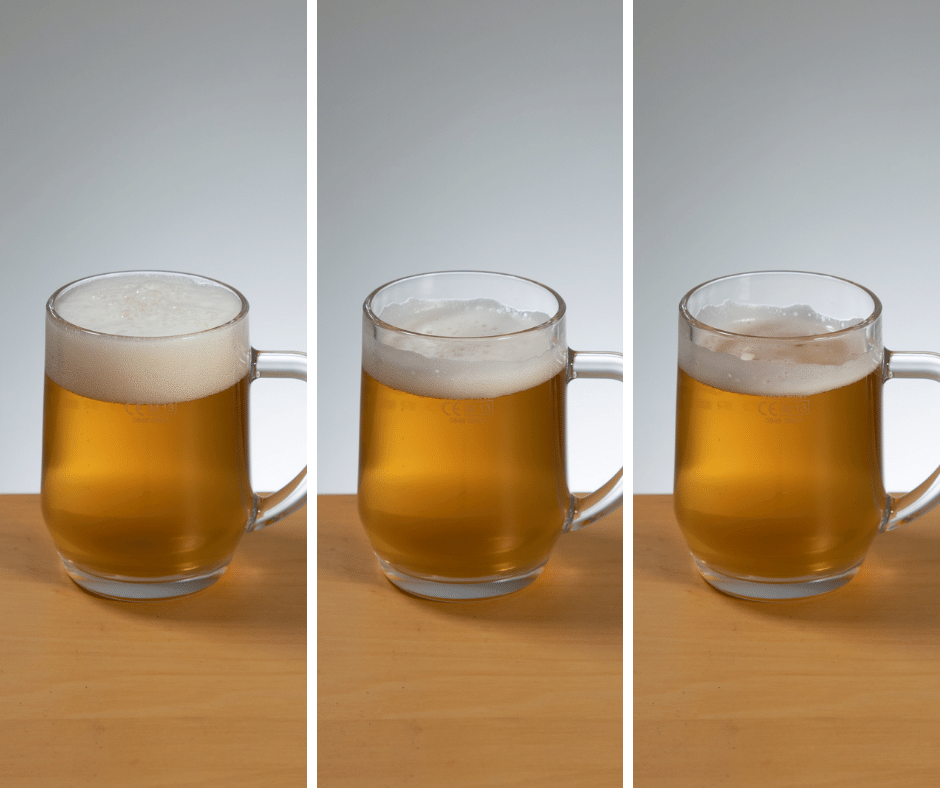
Perfect Pour- Foam Test
All you require is your beer, clean and dry glassware,and a smartphone or tablet. This is aimed at carbonated bottle, keg, and can beers. The test should be performed at the preferred temperature for the brand.
- Take a clean glass with a CE volume mark- Preferably the branded glass intended for that beer and volume.
- Employ a “Perfect pour” technique to reach the volume mark generating foam up to the rim of the glass.
- Set the glass on a table with a plain background and good lighting.
- Take a photo at the start and every 30 seconds for 5 minutes or until there is no foam left on the surface of the liquid.
- Label and store the photos in a folder for comparison
With practice, the consistency of the test will improve. Animations and videos are also possible to make assessment comparisons.
Product trial tips to ensure success
- Foam stability is a complex area, many of the areas which would improve the foam stability are fixed by the recipe and processing in place at the brewery.
- This trial is aimed at retaining as many of the foam stabilising components from the recipe into the finished beer.
- Adjuncts such as wheat flakes and chit malt are often used to improve foam stability, but the foam stabilising components are then lost through vigorous boiling, transfers, fermentation, maturation and packaging.
- Optimal use of Antifoam will prevent foaming upstream in the process where it is undesirable and preserve the foam positive components for the final pour where they are needed.
- See the Murphy and Son datasheet and contact our technical team for support using our Antifoam correctly in your process.
Advice for interpreting the results & benefits
- Change one area of the process at a time whilst monitoring foam quality using the perfect pour test. Good record keeping will help to pinpoint areas in the brewing processes to improve.
- With Antifoam use it is important to use the minimum dose rate possible to get the desired foam control. Labscale trials can help with this.
- Work on the consistency and cleanliness of your glassware. Not only will it make your in-house testing better but you will be able to provide better support to the hospitality sector.
- Take the pictures in the same place, from the same angles and with the same lighting. A lightbox in the lab would be a good option.
| Positive foam factors | Switch Factors- positive, negative or neutral | Negative Foam factors |
| Increased carbonation (& “quality of carbonation) | Liquor (Water) profile & pH | Lipids |
| Presence of nitrogen gas | Hopping regime | Yeast Autolysis |
| High nitrogen barley malt | Adjunct Use | Detergent residues |
| Iso Alpha acids & Reduced Hop Compounds | Non-Starch Polysaccharides e.g. Betaglucan | Over Boiling |
| Clean Dry Glass | Ethanol levels | Over foaming during processing |
| Cations e.g. Calcium | Polyphenol type and levels | Excessive cold end coatings “glass” |
| Reducing unwanted foaming through processing | Malt Type e.g. Base Malt, & Speciality malts | Can lid lubricant residues |
| PGA Use | Malt Modification | |
| Isinglass fining | Filter sheet type |
Foam Factor Summary Table
How good is the beer foam now? Please let us know at techsupport@murphyandson.co.uk
