Key points which can be taken away from this Article;
- There are many points during the brewing and packaging process where variability can cause inconsistency in the final product.
- These variables can be explained by looking at methods, equipment, ingredients and yeast handling.
- Within a small budget, improvements can be made by making the process more consistent, improving storage conditions and refining hygiene techniques.
- A standard base beer can be transformed in terms of flavour attributes and carbonation by the addition of a different secondary yeast strain.
Unlike filtered or pasteurised smallpack products, bottle conditioned beers contain a small amount of yeast which consumes sugars and residual oxygen to give carbonation and flavour development.
This can be a great choice for a brewer who wants to produce small pack beers in-house which will have a long shelf life.
The secondary fermentation taking place within the bottle is similar to that which takes place in cask-conditioned beers, however, the process requires a higher level of control to keep yeast sediment to a minimum and cannot rely on fining agents once in the bottle.
There are various methods to produce bottle conditioned beer, all with their own pros and cons, but it is important to remember that cleanliness should always be a principal consideration throughout every step of the process.
The bottle-conditioning of beer can seem like a rather simple procedure, but a lack of process control can lead to variability in batch-to-batch quality.
Here we look at the process in detail and the choices you can make along the way.
Primary Fermented Beer
There are different methods for bottle conditioning, but all involve a certain amount of beer clarification, so you may want to consider the use of a bright/racking tank.
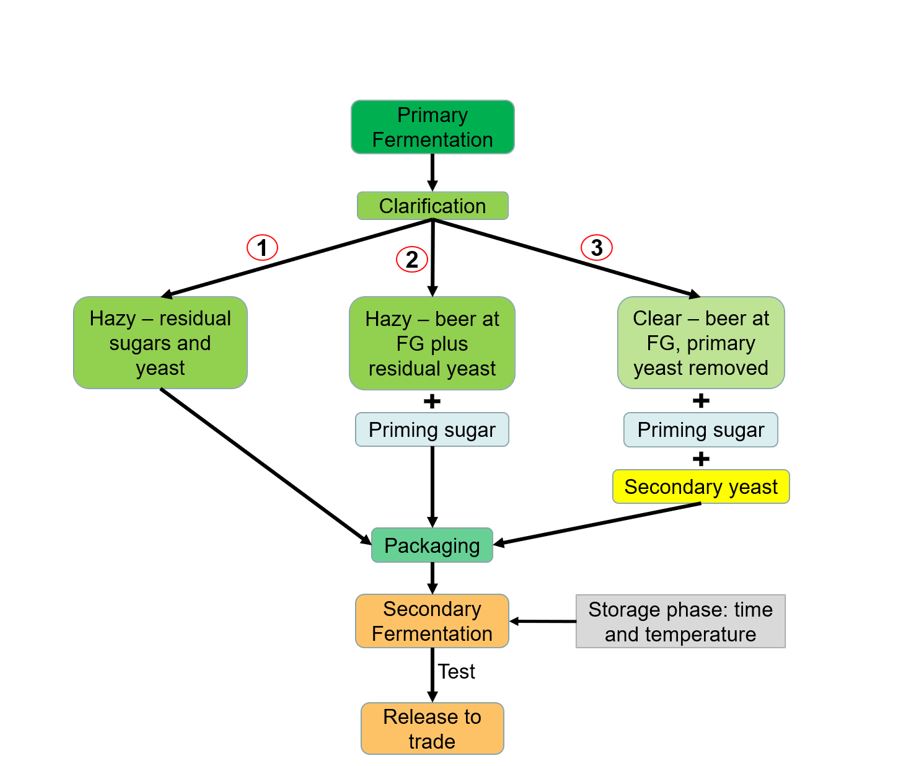
Flowchart highlighting process options
The flowchart above shows the basic options when considering the lead up to secondary fermentation in bottle. Firstly, fermentable sugars need to be available. The sugars required for secondary fermentation can come from two sources:
- The primary fermentation can be halted prior to completion via chilling leaving residual fermentable extracts (see flowchart option 1)
- The primary fermentation can be allowed to ferment out completely and is then primed with fermentable sugar (see flowchart option 2 and 3)
The first option can be difficult to control accurately, especially in larger-scale operations. The sugar addition immediately before packaging also has the advantage of making the calculation for secondary fermentation easier.
When thinking about sugar dosing calculations, three factors need to be considered; final carbonation level, CO2 already in the beer and if there are any fermentable sugars in the primary fermented beer.
To check for residual sugars an attenuation limit test can be conducted. This is simply an aerated sample of the beer which is over pitched with yeast, kept at temperature of 20-25oC and ideally mixed from time to time. The final gravity of this sample is the theoretical limit achievable in secondary fermentation.
Even flat beer contains some CO2, specialised equipment can be used to measure this but as a rough guide, beer which has been fermented at 20oC will have a concentration of around 0.75 volumes (1.5 g/L) (Note: CO2 solubility increases as the temperature of the liquid decreases).
For the final carbonation level this can depend on the style of beer you are producing. A range of 2.5-4 volumes (5-8 g/L) describes everything from usual beer styles up to some higher carbonated Belgian styles.
As well as wanting to get this carbonation level right for the style of beer, you will also want to avoid ‘gushing’ (sudden and uncontrollable foam generation upon opening) or even bursting before opening.
Sugar preparations are available in various forms, such as syrups and granulated sugars. However, the addition of the latter is not advised due to the higher chance of introducing beer-spoiling microorganisms into the process. Consider fermentable extracts supplemented with dextrins to increase mouthfeel and sugar syrups with high fermentability to produce ‘drier’ beers.

Secondly, you need to consider the source of your yeast which will perform the secondary fermentation in the bottle. Again, there are many process options to choose from.
Flowchart options 1 and 2 indicate some yeast has remained in suspension from the primary fermentation and is transferred to the bottle. It is important to remember that the point of allowing living yeast into the bottles is that as well as converting sugar to ethanol and CO2, they will prevent beer oxidation and increase shelf life.
You need to think about the viability and health of the yeast so it can perform as you would wish under stresses such as rising alcohol concentration, nutrient depletion and rising pressure.
The strain used in the primary fermentation may not be the best for the job. And if it is, it needs to be at its best/most healthy. After primary fermentation, the yeast has undergone many stressful transitions before entering the stationary phase of its life cycle which can be inferred from gravity measurements remaining the same consecutively at the end of fermentation.
In contrast to pitching yeast into freshly prepared and aerated wort, the conditions of the beer in the bottle are austere in nature due to having less nutrients, less oxygen, possibly sub-optimum temperatures and the presence of ethanol.
At the end of fermentation yeast can often be inhibited by alcohol (and carbon dioxide) which means issues can especially arise with the use of primary yeast in bottle conditioning.
A better option could be to use the Kräusening method where the foamy top of a fermenting beer is mixed with beer which has finished fermenting. However, be aware this will also contain fermentable sugars from the wort and may cause issues with colloidal haze due to the wort not being stabilised but would adhere to German Reinheitsgebot purity laws (depending on the ingredients in the primary fermentation).
Alternatively, the beer may be clarified completely, and a defined yeast cell count added at bottling (see flowchart option 3).
This step removes unwanted solids whilst also providing an opportunity to use a different yeast strain for secondary fermentation than that used in the primary.
A dual yeast strain approach is useful as a means of introducing new yeast-derived flavours and there is the option to choose a strain which forms compact sediments and readily adhere to glass.
To preserve high viability for as long as possible during secondary fermentation and subsequent preservation of the beer, preference should first be given to freshly propagated yeast (this could also include yeast from the Kräusen which has undergone a washing step), then rehydrated yeast and finally dried.
Work by VanLandschoot et al., (2003) found that yeast propagated on a sucrose medium which was poor in nitrogen had the best secondary fermentation characteristics than yeast propagated on wort. And work by Wood et al., (1992) showed that holding yeast in water for a minimum of 3 hours (max. 24) prior to secondary fermentation also significantly promotes cell attachment to surfaces such as glass.
Although very convenient to pitch into bottles directly, dried yeast’s viability can drop considerably as soon as 5 days into secondary fermentation which can lead to a stuck fermentation. Remember, yeast need to be in good physical condition to perform well!
On average, for most beer styles, a newly bottled beer should contain a viable yeast count of around 10,000 – 100,000 cells/ml. Some Belgian styles can contain up to around 3,000,000 cells /ml.
When selecting a yeast strain for secondary fermentation, you must consider:
- Alcohol tolerance – ale yeasts are fine up to around 8% ABV, above that you may want to consider something like a champagne yeast.
- Different strains produce different foam and bubble sizes which is related to CO2 generation
- Flavour and aroma development capabilities
- Sugar assimilation profile – could be different to that of your primary fermentation and could change the amount of CO2 produced
- Adhesive properties – how well do you want it to settle and stick to the bottom of the bottle
- Secondary metabolites – yeast cells produce some important sulphur components such as hydrogen sulphide (H2S) and sulphur dioxide (SO2). The former component is mostly unwanted, as it is responsible for a “rotten-egg” smell, while some SO2 is desirable in beer as it acts as an antioxidant and stabilises the reactive carbonyl components that are responsible for off-flavours in mature beer.
- How well it ages – issues can arise off-flavours such as acetaldehyde (apple) when yeast becomes “unhappy”. A decrease in yeast activity during conditioning results in delayed or stuck fermentations which alter flavour profiles.
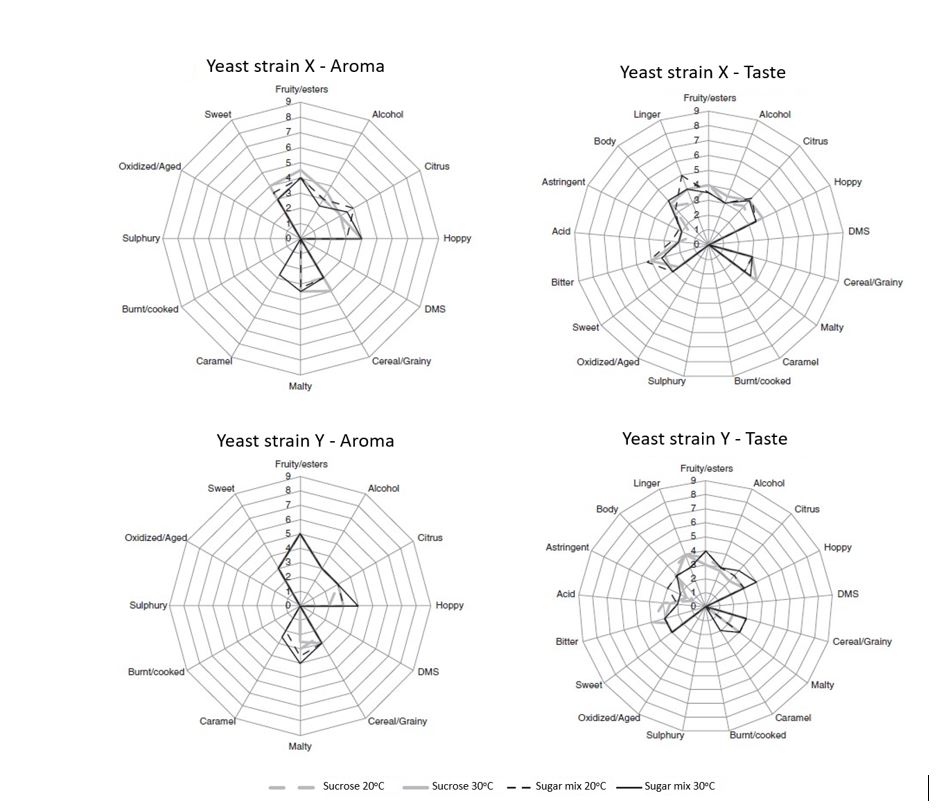
Spider plot analysis of the taste and aroma characteristics of bottle-conditioned beers using different priming solutions, temperatures and yeast strains (based on Marconi et al., 2016).
The spider plot (or radar chart) above quantifies both aroma and taste profiles for bottle conditioned beers which used two different priming sugars, yeast strains and conditioning temperatures. These graphs enable a quick visualization of the differences you can achieve by changing these attributes.
For example, yeast strain Y shows the highest score for fruity/estery aromas and yeast strain X shows the highest scores the citrus, cereal/grainy, malty, sweet aromas.
Certainly, there are sugar, yeast and temperature combinations which would give even more variation than that presented in the spider plot here, but it is always yeast strain metabolism which is central to the significant differences (i.e. changing yeast strain generates the largest changes).
Bottling
For most beer styles, the bottle of choice will likely be a capped 500 or 330ml amber glass bottle (the brown colour filters out visible and ultraviolet light which cause photolysis of the isomerised hop α-alpha acids and then bind to proteins containing sulphur; skunking).
These may not be suitable for beer styles with over 3.5-4 volumes of CO2. Higher than that may require a swing top or a champagne bottle.
It is best to check with the manufacturer the maximum pressures if you are concerned. All bottles should be checked for cracks and chips before and after filling. Ideally, it is a good idea to also fill at least one brown plastic PET bottle.
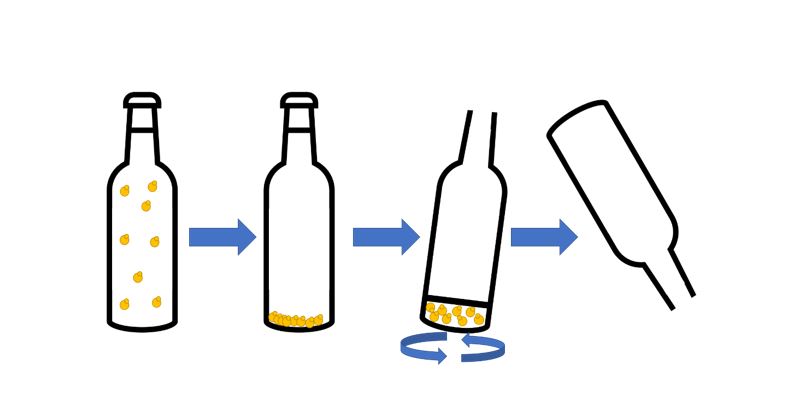
They offer the opportunity to do a “squeeze test” on the bottles during conditioning to give you an idea of how the secondary fermentation is progressing without having to open a bottle.
If the primary fermentation has been cold conditioned or put to chill, allow to warm over 10oC prior to priming and bottling (up to 20oC is favourable to reduce yeast cold shock).
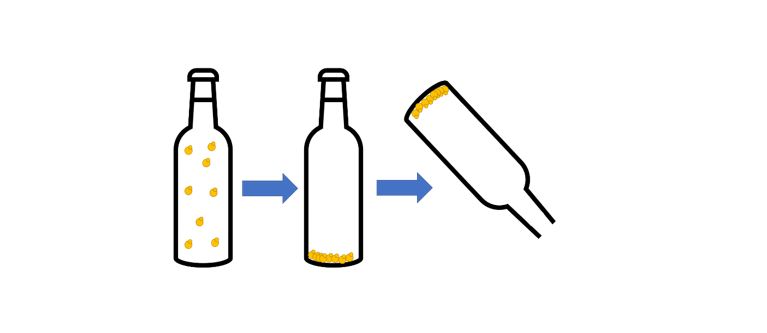
After yeast has been added to the beer, completion of bottling needs to be swift. Taking too long may mean the sugars have already been utilised prior to capping leading to under-carbonated beers and the development of off-flavours.
Conditioning
The conditioning phase is an important step in the process and should not be underestimated. This is the last part of the process which you have control over before the product goes out to trade. The specifics of times and temperatures will be beer style and yeast strain dependant, but the average will be between 2 – 4 weeks at 15 – 25oC to ensure all fermentable sugars are metabolised and the desired carbonation level has been reached (too cold; under carbonated, too hot; negatively impacts yeast).
For higher-alcohol style variants much longer storage times (6 months to 2 years) are claimed to be required although this will be more a matter of personal preference.
During the conditioning period for a moderate strength beer (4–5% ABV), the CO2 concentration increases to around 3 volumes (6 g/L) and the total yeast count to 2 – 3,000,000 cells/ml. Also, the yeast has what is termed as a “reducing power” since aldehydes are reduced to alcohols which are less flavour active and therefore prolongs shelf-life.
Once conditioning is complete, open a bottle to test the aroma and taste profile for yourself. Once you have ensured there are no off-flavours it is ready to send out to trade. Part and parcel of the bottling conditioning ethos is that it’s meant to differ from its keg/cask/filtered counterparts.
Aged flavours do not have to be off-flavours so it could be worth including some descriptors of what the consumer may expect in their beer.
This consumer education can also extend to what haze to expect.
-Does the pour require extra care to avoid the yeast in the bottom of the bottle entering the glass?
-Or would you like the consumer to mix the last few centimetres of beer in the bottle to rouse the yeast and pour it into the glass?
You may want to do this based on beer style. The yeast in the glass should only add a haze and not form large clumps. Yeast in suspension adds body and a smooth/silkiness to the mouthfeel as well as changing the IBU’s due to bitterness compounds interacting with yeast cell walls.
Also, what shape glass would be best for your beer?
If you think about classic Belgian style bottle conditioned beers, they’re often associated with large glasses to accommodate the foam which is produced.
All these aspects really add to the experience for the consumer and can make the pour a more theatrical event and the beer more interesting to drink. This really helps to place bottle conditioned beers in the premium section of the market.
What happens at the end of shelf-life?
As described previously, live yeast in the bottle has a myriad of benefits when done in the right way, under the correct conditions, as it ensures a prolonged flavour stability and therefore an increased shelf life.
But once the fermentable carbohydrates are metabolised completely the yeast cell ceases metabolism, the permeability of the cell membrane increases and as a result compounds such as amino acids, peptides and nucleotides leak into the beer.
Finally, when stored for long periods yeast may exhibit autolysis. This impacts on the final product because of the release of enzymes like proteases, nucleases and esterases which can influence properties such as foam, mouthfeel and flavour.
Yeast autolysis may be desired during the production of sparkling wine so that it can be aged on lees giving them their roundness and characteristic flavour.
However, for most beer styles, yeast activity should be preserved for as long as possible due to the positive influence of yeast reducing power on beer aging and to avoid the negative effects of autolysis on foam stability and flavour.
Can conditioning
There is the opportunity to take the principles described above and apply them to can conditioning. This can require more investment, be that in a canning line or contract canners.
The carbonation levels need to be considered with the upmost care so as not to make the cans bulge under too much pressure. Cans are also filled cold to avoid over foaming which will cause cold stress on the yeast and may extend the lag phase before secondary fermentation or lead to issues with stuck fermentations.
Cans should be seamed on foam to reduce oxygenation, nevertheless, there could be more oxygen than the yeast cells can utilise and you may want to consider the addition of an antioxidant.
Cans do also have the added benefit of being impenetrable to light and the double seam eliminates the ingress of oxygen (unlike some bottle caps over time).
Experimentation
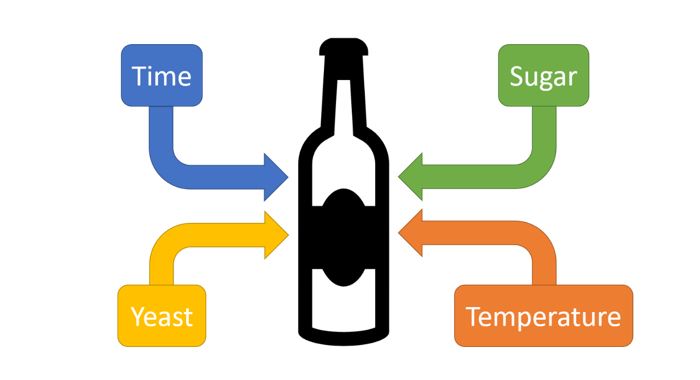
From this blog you will have gathered that variation in small details can result in significant changes in the end product.
Please do not stress about this or let it put you off – when making a new bottle (or can) conditioned beer, write down as much information as you can. Too much information is better than too little! When the beers are how you like them, you will have a detailed protocol to follow for next time.
Besides, as much as small details can cause you problems, they can also be exploited to your advantage. You could easily create a range of bottle-conditioned beers from a large batch of ‘base beer’ and split subsets with different priming sugars, yeast strains and conditioning temperatures.
You may also want to keep a batch in your own store to taste at different time points and sell some vintage bottles (especially if they are higher in ABV).
To take this a step further, experimentation with different microorganisms will introduce a new dimension with new flavour compounds producing unique aroma and taste characteristics.
The broad array of secondary metabolites, which may differ considerably from your brewing yeast (Saccharomyces cerevisiae), can be considered as a way of ‘bioflavouring’ your beer. This way you can produce innovative specialty beers with high added value.
Brettanomyces sp. –
‘Brett’ – metabolises dextrins (not metabolised by Saccharomyces) and develops acidity, volatile phenols and has a specific higher alcohol and ester profile. It is excellent for bottle conditioning as it can remain viable after 5 years. Specifically, it can produce sensory profiles which can include the descriptors smoky, clove-like, spicy, mousy, barnyard, phenolic, metallic, cracker biscuit, sweaty, apple, floral, tropical fruit and/or citrus. This also makes it a good candidate for enhancing the bacterial profiles in your sour beers.
You may want to consider strains of Brett as a secondary strain as a mixed culture alongside a Saccharomyces cerevisiae.
Equipment
This equipment can be bought on a relatively small budget but will help improve accuracy and therefore your batch to batch consistency: –
- Microscope – visualise your strains and look out for abnormalities
- Hemocytometer and methylene blue – cell counts and % viability
- Saccharometers – buy the most accurate that you can, ideally ones with calibration certificates, or certificates showing traceability to national UKAS standards
- Accurate measuring cylinders
- Accurate thermometer
- pH meter
- ATP swabs to ensure sanitation procedures have been successful
Troubleshooting checklist
Having issues or batch to batch variation?
- Sanitise, sanitise, sanitise!
- Make sure your priming sugar is well distributed
- Pay attention that your seals are good whilst capping
- Low carbonation? – were the bottles stored at a warm temperature during the conditioning (secondary fermentation) phase?
- Was there the right amount of viable and active yeast?
- Was the warm conditioning phase long enough before refrigeration?
- Flavour changes – has there been yeast autolysis? (if cells rupture, they can release enzymes; proteolytic, ester degrading… you could consider flash pasteurisation after conditioning, even at ~50oC improvements can be seen due to deactivated enzymes).
- Was pH monitored throughout the process?
- Residual extract such as high maltose sugar composition can negatively impact yeast cells ability to flocculate causing variability in sedimentation and haze upon pouring.
- Unwanted haze? Were auxiliary finings used in the FV prior to racking? These significantly boost yeast cell attachment after secondary fermentation minimising sediment disruption on dispense.
If you have any questions or want to discuss the process further, please get in touch.
Stephanie Brindley – stephanie.brindley@murphyandson.co.uk
BSc (Hons), MRes, PhD
References
Boulton, C., 2013. Encyclopaedia of brewing. John Wiley & Sons.
Boulton, C. and Quain, D., 2001. Brewing yeast and fermentation. John Wiley & Sons.
Dekoninck, T.M., Mertens, T., Delvaux, F. and Delvaux, F.R., 2013. Influence of beer characteristics on yeast refermentation performance during bottle-conditioning of Belgian beers. Journal of the American Society of Brewing Chemists, 71(1), pp.23-34.
Marconi, O., Rossi, S., Galgano, F., Sileoni, V. and Perretti, G., 2016. Influence of yeast strain, priming solution and temperature on beer bottle conditioning. Journal of the Science of Food and Agriculture, 96(12), pp.4106-4115.
Vanderhaegen, B., Neven, H., Coghe, S., Verstrepen, K.J., Derdelinckx, G. and Verachtert, H., 2003. Bioflavoring and beer refermentation. Applied Microbiology and Biotechnology, 62(2-3), pp.140-150.
Van Landschoot, A., Vanbeneden, N., Vanderputten, D. and Derdelinckx, G., 2004. Effect of pitching yeast preparation on the refermentation of beer in bottles. Cerevisia, 29, pp.140-146.
Wood, K.A., Quain, D.E. and Hinchliffe, E., 1992. The attachment of brewing yeast to glass. Journal of the Institute of Brewing, 98(4), pp.325-327.
